Saturday, September 1, 2012

Make your own seed packets

make your own seed packets

I've got a fun little project for you with a little garden education mixed in!  I want to show you how to make seed packets.  They make great little gifts and if you are an Etsy seller, could also be perfect for that extra something special to include in your orders to say “Thanks!”
 

Friday, August 31, 2012

Recycle a belt 3 ways

recycle a belt 3 ways

Got any belts you don’t wear anymore but might be nice as something else?  I’ve got 3 projects we can do that are super fast and super easy.
 

I’ll show you how to make a hair pin, a bracelet and a headband.  Just as practical as a belt, right?

Wednesday, August 29, 2012

Flower halo | Flower Chandelier

flower halo 0

Hi guys!  I owe you all some crafts so I’ve come today with two!


That sweet little girl above is my daughter Ellie.  She recently went to the most fabulous birthday party I’ve ever seen.  It was a fairy themed party complete with costumes for all the girls to wear and keep.  They included fairy wings, a tutu, a top, a large fairy wand with flowers and ribbon attached to a bamboo stick and those sweet little flower halos.  The moment I saw the halo on Elliott, I knew I had to make some.

Monday, August 27, 2012

Monday Morning

033043

Welp, my coffee maker died this morning.

Yes, so sad.  I have one of those coffee makers that doesn’t have a carafe but instead has a reservoir built in.  You put your cup up to the lever and like magic, coffee comes out.  This morning, like devil’s magic, it continued to pour out and leaked all over the counter onto the floor.  My brain did not know how to compute the fact that I may not be having my morning cup of joe.  I never start a day without my beloved dark brew.  But I must say, that coffee maker has put in many years of reliable, delicious coffee so I can’t be mad.  On the bright side, I found my french press that I bought like 10 years ago.  Hot water + coffee grinds = happy me!   Problem solved.

This morning at 8 a.m. was my first on-campus class of the semester.  Exercise and Weight Control.  Hey, it was a 1 credit hour class that I needed and who doesn’t like a P.E. class?  So it was time to pull out the old sneakers.  Yes, I know, I don’t wear socks.  Gross.  And yes, my feet do stink.  Don’t judge me, I hate socks.  Nothing a little baking soda won’t fix.  So it turns out this class might actually be what I need.  I’ve wanted to start working out but I find crafting to be more therapeutic but now I have the chance in this class.  Our instructor (a handsome bald black man who coaches the basketball team) said that he would help us to lose, gain or maintain our weight.  In my case it’s maintain.  I would however, like to tone down these man arms I’ve got.  I’ve never had feminine arms at any point in my life.

So are you wondering why I’m rambling on about my morning instead of sharing with you how to execute a fabulous craft?  Yeah, me too.  Sadly, I don’t have a craft for you today but I didn’t want to leave you hanging.  I have a lot of ideas in my head but no finished products.  This weekend was spent doing school work and creating more inventory for my Etsy shop.  I hope you can forgive me and still continue to come back.  I promise I will bring you more funsies and less of my ramblings.  I’ll leave you will this bit of inspiration, though.  I got an email from one of my readers, Charlie.  She made one of her own steering wheel covers using my instructions and even made a felt bead necklace to hang from the mirror like mine!  She sent me a picture and it has just made my day!

image.png

Have a great Monday you guys!

Saturday, August 25, 2012

A Saturday for the birds

modern birdhouse 1a

Today is the first day of school for me, so the better portion of my morning has been spent doing coursework.  I get really excited to start the beginning of every semester, mostly because I’m a nerd and I love the challenge of keeping my GPA up over a 3.5 and I really like to learn.

After I got a good amount of school work out of the way, I started on some really fun stuff.  I’m going to be running an ad on A Beautiful Feather so I’m trying to stock up my Etsy store.  You should go check out that blog if you haven’t already.  In the meantime, I’m going to be crafting more “handmade love” in Abernathy Studios.  This is one of my new birdhouse designs.  I’ve got some other ideas floating around in my head but I’ve got to work out some kinks.  What do you think about the modern design of the new birdhouse?

Friday, August 24, 2012

Fabric block coasters tutorial

fabric block coasters


I love looking through my mom’s fabric stash.  A lot of the fabrics remind me of special times.  I get my love of sewing from her and we’ve been through a lot of adventures together just since I started sewing.  From the time she taught me to sew at her first sewing studio to the trip we took to Ohio to buy the fabric for her fabric store.  We’ve brainstormed many ideas together; some awesome and some not so great.  We are both really bad about not finishing projects or making things and not doing anything with them. 

As I was looking through her fabric, I found a bunch of these that she had been making for Christmas some years back and I remember always liking the idea.  She used to make them as ornaments but I really like them as coasters.  I think these would make a sweet hostess gift.

So today I’m going to show you a really easy tutorial on how to make these fabric block coasters.

fabric coaster

This is a perfect scrap buster project.  It requires small pieces of fabric and is soooo easy.
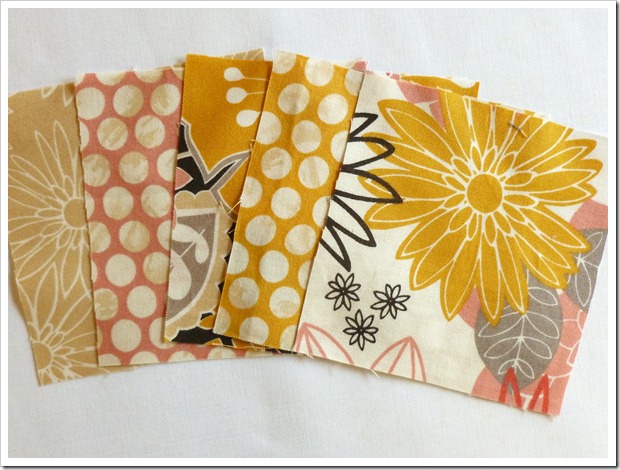
fabric block coasters

You need five squares of coordinating fabrics.  I cut mine out at 4” but the size is up to you.  The finished coaster will be 1/2” smaller than that.

fabric block coasters

Decide which square you want to use as the bottom piece and set that one aside.  Fold the other four in half and press.
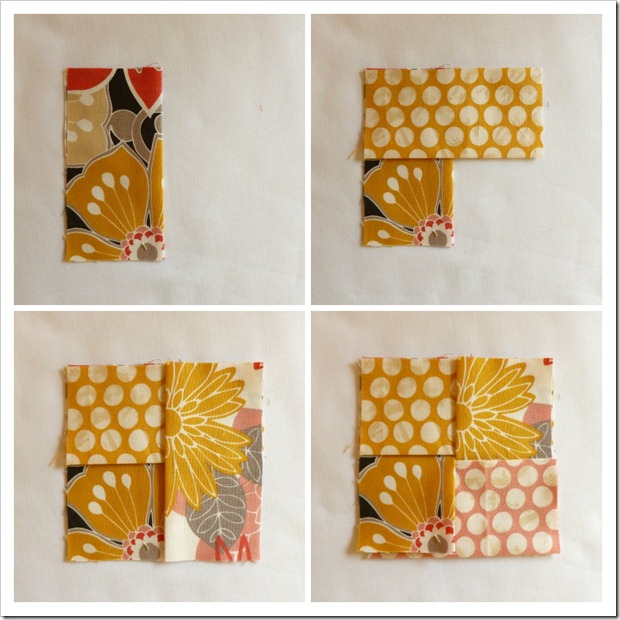
fabric block coasters

Next, assemble the pieces, one by one, like above.  Be sure to lay them out with the raw edges to the outside of the square.

fabric block coasters

Now lay the bottom piece on top of your assembled square with it’s right-side down and pin.

fabric block coasters

Sew around all four sides using the edge of your presser foot as a guide and clip the corners.  Don’t worry about leaving an opening like you would on pillows and such.  Just sew all around the square.

fabric block coasters

Flip it over and using the opening in the center, turn it right side out and give it a good press with your iron.

fabric block coasters

I’m using mine as I type up this blog post.  ;) They are much more absorbent than tile coasters and they can be thrown in the wash if needed.
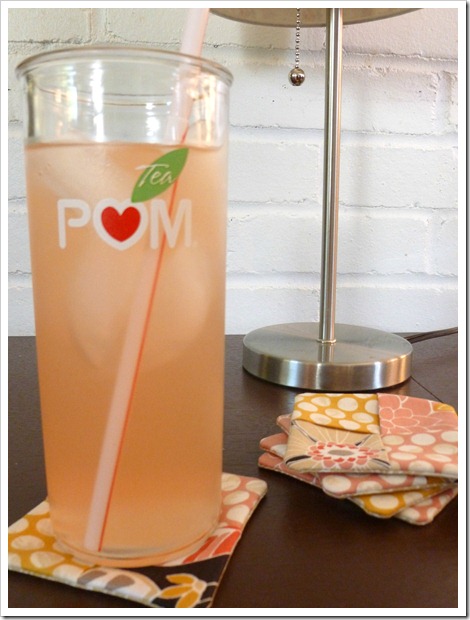

fabric block coasters

Thanks, Mom, for the inspiration!  I must say, I’m your biggest fan!

Wednesday, August 22, 2012

Colored votives

painted votives

Lovely colored votives look so happy, don’t they?

painted votives


My kids made sun catchers the other day and there was a lot of paint leftover.  The paint was perfect for painting glass, obviously, so I painted some glass votives I had on hand.  Whether washed in sunlight or holding a dancing flame, these colored votives add a bit of happy to the room!

Monday, August 20, 2012

Fraggles and Friggles | Sponsor Highlight

fraggles and friggles
I am so very excited to introduce you guys to my second sponsor for Abernathy Crafts.  Her name is Elizabeth and she has a cute little Etsy shop called Fraggles and Friggles. 

A lot like my shop, Fraggles and Friggles is full of random and delightful crafts.  Right now she offers jewelry, coasters, hand-woven scarves, and screen printed tees.

Hydrangea earrings

I have to say, my favorite item in her shop is this pair Hydrangea earrings!  I love Hydrangeas and these earrings are so delicate and sweet.  I don’t think I’ve seen anything like that on Etsy and I like that she is creative enough to offer something different.

rhode island coasters

A lot of her inspiration comes from her mother whose love of geology and rocks is translated into her gemstone bracelets.  She also has a loom, so those great looking scarves she has are hand-woven.  I find that very impressive.

I’m so honored to have Elizabeth here and I hope you find her shop to be just what you were looking for.  I hope to see a lot more from her shop, I’m crossing my fingers for more science related geekery.

Thanks Elizabeth!

elizabeth mermelElizabeth is a big fan of up-cycling, has a degree in Microbiology and lives in Rhode Island with her boyfriend.  Visit her Etsy shop, Fraggles and Friggles and “like” her on Facebook.

Saturday, August 18, 2012

Make window clings

046
I found that plastic cling wrap (Saran) makes great window clings!  Use Sharpies to draw a picture and color in and you get the same effect as sun catchers!  They go up and come off easily.  When laying out the plastic wrap, it’s a good idea to tape it to the table before you starting drawing.
048
A fun way to dress up your windows on a sunny day or something to do when it rains!

Friday, August 17, 2012

TOMS-inspired tote

TOMS inspired bag

I bet a lot of you might recognize this as the TOMS bag.  Only, this isn’t a shoe company, it’s my son’s book tote!


TOMS inspired bag

Although, I was definitely inspired by the TOMS bag.


TOMS inspired bag

I thought it would be a cute way to personalize a child’s tote or pencil case.
 

TOMS inspired bag

It was super simple to make.  I found a font on my computer that was very similar to the TOMS lettering (Corbel) and sized it to fit the tote I was going to make.  I used the freezer paper method (tracing the letters right off my computer screen) to print the letters and the blue bands.

TOMS inspired bag

I even added four grommets in the corners just like how the TOMS bags always come.
If you wanted to do something similar for your child (or for yourself) but maybe you think their name is too long or you just don’t want a name, you could always add any other word like “PENCILS” or “PENS” for a pencil case or the word “ARTS” would be cute on a tote.
Do you have any ideas for TOMS bags?  I have a bunch that I don’t use as bags but I just know there’s something I could do with them.
 

TOMS inspired bag

Wednesday, August 15, 2012

Make a spin drum

spin drum
Remember the end fight on Karate Kid II when Daniel-son is getting his butt kicked and the audience started pounding those tiny drums that led to his victory?  Yeah.. I loved that part.  Well I wanted to make some for my kids and my fabulously lovely boyfriend gave me the greatest idea!  He also went to the store that night to get the supplies so that I could get to work on some spin drums.  So here’s what we came up with, only ours don’t have the Japanese flavor of the “Den-den Daiko” as they are called.  The kids loved them so much they hardly gave me a chance to show them how to do it.  They just wanted to play with mine until I got theirs done.


how to make a spin drum
So here’s what you need to make your own:

  • 2 balloons
  • 2 mason jar lids (same size)
  • twine
  • 2 beads
  • 1/4” wooden dowel
  • craft glue
  • scissors
  • hammer and screwdriver

how to make a spin drum
First, cut the necks off of your balloons.
how to make a spin drum
Next, remove the inner discs of the lids.  You don’t need them.  Using a hammer to pound a screwdriver, make a dent in both of your mason jar lids.  This is where the dowel will fit in.
how to make a spin drum
Now stretch the balloon over the lid so that the open part of the balloon is on the inside of the lid.  The tighter, the better.  You’ll get better sound that way.
how to make a spin drum
Line the perimeter of the inside of the lid with craft glue.  Lay your twine across in the middle and lay a dowel on top resting in that little ditch you made with the screwdriver and hammer.  A little more glue on the dowel will be helpful.
how to make a spin drum
Sandwich the two lids together and rest something heavy on top, like a book.  Wait for the glue to dry.
how to make a spin drum
Tie on a bead on both sides so that the bead hits the middle of the drum.  Then decorate as you please!
how to make a spin drum
Here’s mine (above) and my son’s (below).  Now pass them out to all your kids and curse yourself later as to why in the world you gave them all noise makers.  Let’s just hope it doesn’t prompt them to start kickin’ butt like Daniel-son did!


how to make a spin drum

Thank you, baby, for your marvelously crafty idea!!  I love you!! <3

Monday, August 13, 2012

Continuous Threads | Sponsor Highlight

continuous threads

I am so tickled to introduce you to a couple of fabulous ladies that you will want to get to know.  They are my first sponsors of Abernathy Crafts!

Jeannie and Manderley run a small business called Continuous Threads in Oak Ridge, Tennessee where they do all things sewing.  They offer a variety of services from custom dressmaking, weddings, proms and costumes to sewing classes from beginner to advanced.

Manderley specializes in costuming.  She has done numerous costumes for the Oak Ridge Playhouse, children and adults and has even created the bee costume you see below for the local newspaper’s mascot.

custom costumescostumes

Jeannie specializes in dressmaking and home décor.  She has done many weddings and proms as well as everyday wear.  She also does draperies, bedding, and other home décor.  Below is her daughter’s wedding dress and a quilt with a pillow she made for her granddaughter.
 
wedding dressbaby blanket and pillow

There is no end to the variety of jobs they are willing to take on and I invite you to go check these ladies out.  Like them on Facebook and don’t be afraid to inquire about any custom sewing jobs you might have.  They make it a very painless and affordable process and won’t stop until you are happy.  If you don’t live in the Oak Ridge area, not to worry!  They have done orders online.  Just contact them and let them guide you through the simple and exciting process.

Thanks Jeannie and Manderley, for supporting Abernathy Crafts!

ShareThis

LinkWithin

Related Posts Plugin for WordPress, Blogger...